Slotted animation drum
A Ø 19 cm card drum with 12 slots that spins on the tip of a wooden skewer: inside there is a strip of 12 drawings and, when you look through the slots as it turns at one revolution per second, the drawn ball bounces.
What they will learn
- That an animation is a series of still images that change little by little, which the brain joins together if they are seen at more than ~10 per second.
- Why the slots are needed: they act as a shutter that shows each drawing for an instant and hides the movement in between.
- To plan a 12-frame cycle that starts and ends the same way (a bouncing ball, a person walking).
- That an object that spins supported above its centre of gravity is stable, like a hanging spinning top.
Prepare beforehand
- Print the 3 walls B at 100 % on card (or trace them), the floor A and the strips C/D on A4 sheets; check with a ruler that each wall measures 215 mm.
- If the children are young, cut the 12 slots yourself with a craft knife before the session (they are the trickiest step).
- Pierce the centre of the cap with a hot nail or an awl (3 mm hole).
- Check that the skewer fits loosely in the straw (it must turn without rubbing).
Materials and tools
- Black or dark-coloured card — 2 A4 sheets, 200–250 gsm
for the drum wall (a dark inside gives more contrast); print or trace templates B onto it - Corrugated cardboard — 1 sheet, 35 × 20 cm
3 mm, for the drum floor (Ø 190 mm) and the base (2 × 150 × 150 mm) - White A4 sheets — 2
for the drawing strips (80 gsm) - Old CD — 1 (optional)
glued under the floor as reinforcement and central weight - Wooden skewer — 1
Ø 3 mm, straight; a 120 mm length with the point is used - Straw — 1
straight, inner Ø 5–6 mm; a 75 mm length - 1-cent coin — 1
or a flat hard plastic button, 15–20 mm - Plastic cap — 1
bottle cap, Ø 30 mm: holds the skewer upright on the base - Hot glue and PVA glue — 2 sticks / a little
hot glue for axle and hub; PVA for the wall - Masking tape — 1 m
to join the wall to the floor from the outside - Black and coloured felt-tip pens — several
medium tip; a figure with a thick outline shows up better
Tools
- Craft knife, metal ruler and cutting mat — cutting the 4 × 45 mm slots adult
- Scissors — cutting out walls, floor, strips and straw
- Compasses (or a 19 cm plate) — drawing the floor if you don't print it
- Awl or 3 mm nail — piercing the centre of the floor, the base and the cap adult
- Hot glue gun — gluing the skewer, cap, straw and coin adult
- Ruler and pencil — checking measurements and spacing the drawings
Pieces and templates
- A · Drum floor ×1 — corrugated cardboard 3 mm
- B · Slotted wall ×3 — black card 200–250 gsm
- C1 · Drawing strip: bouncing ball (frames 1–4) ×1 — 80 gsm paper
- C2 · Drawing strip: bouncing ball (frames 5–8) ×1 — 80 gsm paper
- C3 · Drawing strip: bouncing ball (frames 9–12) ×1 — 80 gsm paper
- D · Blank drawing strip ×3 — 80 gsm paper
- E · Base ×2 — corrugated cardboard 3 mm
- F · Hub (straw) ×1 — straw Ø 6 mm
- G · Axle (skewer) ×1 — wooden skewer Ø 3 mm
- H · Hub reinforcement ×2 — corrugated cardboard 3 mm
Step by step
Cut the drum floor adult
Cut out disc A, Ø 190 mm, from corrugated cardboard. Make a 6 mm hole in the centre with the awl (the straw should fit snugly). If you are using the CD, glue it underneath, centred, with PVA or hot glue.
1 Draw a Ø 190 mm circle and cut along the line 2 Pierce the centre with the awl: 6 mm hole 3 Glue the CD underneath, centred; measure 190 mm in two directions Check: Rest the disc on a table: it must lie flat. Measure the diameter in two directions: 190 mm.Cut the three walls
Cut out the three B pieces from card (215 × 120 mm each). The 15 mm strip at the end is the tab for gluing to the next wall.
1 Print or trace wall B onto the card: 215 × 120 mm 2 Cut the wall out along the line with scissors 3 Cut 3 identical walls; the 15 mm strip is the tab Cut the 12 slots adult
With a craft knife and metal ruler, cut the 4 slots of 4 × 45 mm in each wall, starting 5 mm from the top edge. Cut the two long sides first and then the short ones.
1 Mark 4 slots of 4 × 45 mm, 5 mm from the top edge 2 Cut the long sides, running the craft knife along the metal ruler 3 Cut the short sides: straight slots 50 mm apart centre to centre Check: The slots are vertical, all at the same height and 50 mm apart centre to centre.Join the walls into a strip
Glue the three walls in a row with PVA glue, overlapping each join by 15 mm on the marked tab. You end up with a 615 mm × 120 mm strip with 12 slots: 600 mm usable plus the 15 mm tab at the end, which will close the ring. If the card is light-coloured, paint the inside face black.
1 Put glue on the 15 mm tab 2 Cover the tab with the next wall and press 3 One strip with 12 slots; at each join there are also 50 mm Check: Check that the distance between the two slots at each join is also 50 mm.Close the drum
Wrap the strip around disc A, with the slots at the top and the floor inside, flush with the bottom edge. Glue the last 15 mm tab to close the ring and join wall and floor from the outside with a continuous strip of masking tape.
1 Wrap the strip around disc A, slots at the top and floor inside 2 Glue the last tab and tape the outside, all along the edge 3 The floor sits inside, flush with the bottom edge Check: The drum is round, with no dents, and the floor cannot be seen below the wall.Fit the hub adult
Cut 75 mm of straw (F). Hot-glue the 1-cent coin over one end. Push the other end through the hole in the floor from above until 5 mm sticks out underneath and fix it with hot glue above and below, perfectly upright. Also glue the two H discs around the straw as reinforcement: one on top of the floor and one underneath (or the CD).
1 Cut 75 mm of straw (F) 2 Hot-glue the coin over one end 3 Push it in from above: 5 mm sticks out. Fix it straight and glue the H discs Check: Look at the drum from the front and from the side: the straw must be perpendicular to the floor.Assemble the base and axle adult
Glue the two E pieces with the corrugations crossed. Glue the cap upside down in the centre. Push the skewer (120 mm length, point up) through cap and base until 90 mm sticks out above the cap; the rest stays inside the cap and the base. If it sticks out below the base, cut it off flush so the base sits flat. Fix it with hot glue underneath and around the cap.
1 Glue the two E pieces with the corrugations crossed 2 Glue the cap upside down and push the skewer through it, point up 3 Fix it with hot glue and check with the set square that it is vertical Check: The skewer is vertical (check it with a set square from two sides).Test the spin
Slide the drum's straw onto the skewer until the point touches the coin. Give the edge a gentle push with your finger: it should turn at least 3–4 times on its own without touching the cap.
1 Lower the drum: the skewer goes into the straw from below 2 The point touches the coin; there are 20 mm down to the cap 3 Give the edge a gentle push: it should turn 3–4 times on its own Check: There are about 20 mm between the drum floor and the cap (the straw sticks out 5 mm and stays 15 mm above the cap). If it rubs, trim the straw or set the skewer higher.Prepare the drawing strip
Cut out the 3 C strips (bouncing ball, already drawn) or the 3 blank D strips (200 × 55 mm, 4 frames of 50 mm each). If you draw your own, draw the same figure in all 12 frames, changing it very slightly from one to the next, and make frame 12 lead into frame 1.
1 Cut out the 3 C strips (ball) or the 3 blank D strips 2 Draw the key frames first: 1, 4, 7 and 10 3 Fill in the in-betweens: frame 12 must lead into frame 1 Tip: Draw frames 1, 4, 7 and 10 first (key positions) and then fill in the in-betweens.Glue the drawings inside
Glue the three strips inside the drum, one after another in order 1 to 12, with the drawings facing the centre, between 58 and 113 mm from the top edge (just below the slots). Each frame must be centred below a slot.
1 Glue the strip inside, 58 to 113 mm from the top edge 2 Carry on in order from 1 to 12, one frame below each slot 3 Each drawing centred below its slot; if it shifts, it jumps Check: There are 12 frames and 12 slots: each frame below a slot.Spin it and watch
Put the zoetrope on a table with good light from above. Bring your eyes level with the slots, 20–30 cm from the drum, and turn it with your finger at roughly 1 revolution per second. Look through the slots passing in front of you towards the drawings on the other side.
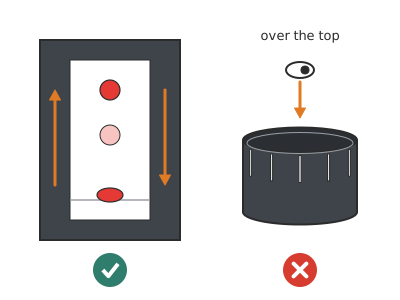
1 Light from above and your eyes level with the slots 2 Spin it at 1 revolution per second and look through the slot to the other side 3 The ball bounces on the spot; looking over the top, just a blur Check: The ball bounces on the spot. If it looks blurry, spin a bit faster; if it flickers a lot, add more light.
Does it work? The test
With a desk lamp shining from above, turn the drum with your finger at ≈ 1 revolution per second and look through the slots with one eye level with the top edge.
What should happen: You see the ball go up and down smoothly, without travelling around the drum, with a slight flicker. At less than half a revolution per second it looks jerky; with the drum still, you see just one drawing behind each slot. Looking over the edge (without slots) you only see a blur.
If something goes wrong
- You only see a blur — You are looking over the edge and not through the slots. Solution: Lower your head until your eyes are level with the slots and look through them to the opposite side.
- The drum stops quickly or wobbles — The straw is crooked, rubs against the cap, or the skewer point does not touch the coin. Solution: Straighten the straw with hot glue; trim 5 mm off the straw or raise the skewer so there is a gap below the floor.
- The figure moves forwards or backwards around the drum — There is a different number of drawings and slots, or the frames are not evenly spaced. Solution: Use exactly 12 frames of 50 mm, one below each slot.
- The image is very dark — Slots too narrow or too little light inside. Solution: Light it from above with a desk lamp. If the slots are less than 3 mm wide, widen them to 4 mm.
- The image is blurry — Slots too wide (more than 6 mm) or it is turning too slowly. Solution: Narrow the slots by gluing a strip of card along one side; spin it a bit faster.
- The animation «jumps» at one point — The last drawing does not lead into the first. Solution: Redraw frames 11 and 12 so they lead smoothly into frame 1.
Safety
- The craft knife is used by an adult with a metal ruler and cutting mat; children keep their hands away from the blade.
- The skewer point is sharp: always keep it covered by the drum or by a lump of modelling clay when the drum is not on it.
- Hot glue burns: the adult applies it.
- Do not spin the drum very fast near your face: it can fly off the axle.
The science behind it
For children
If you see lots of pictures very quickly, one after another, your brain joins them together and thinks something is moving. But if the pictures slide past non-stop, they all look smudged. The slots are like blinks: through each slot you see a single drawing for an instant, and then everything is hidden until the next one. That way you see 12 drawings per second, one after another, each one a tiny bit different, and the ball really seems to bounce. That's how cartoons began!
For the adult
The zoetrope (W. G. Horner, 1834, under the name «Daedaleum») breaks time down into samples. The slots act as a shutter: as each slot passes in front of the eye, for ≈ 4/50 of the period between slots, the drawing on the opposite side is seen in an almost fixed position; between one slot and the next, the opaque wall hides the displacement. If the number of drawings matches the number of slots, each new drawing appears in the same visual direction and the figure stays in place (with N drawings ≠ N slots it moves forwards or backwards: the stroboscopic effect). The brain interprets the succession of images as continuous motion (apparent motion or the phi phenomenon) above ~10–12 images/s; with 12 drawings, 1 revolution/s gives 12 images/s. The residual flicker is because 12 Hz is below the flicker fusion frequency. The slot width sets the sharpness: the drawing moves while the slot is open, and a 4 mm width over a 50 mm pitch limits the blurring to ≈ 8 % of the movement between frames. Mechanically, the drum hangs from the skewer point (support above its centre of mass, ≈ 70 mm from the floor compared with ≈ 35 mm for the centre of mass), so it is stable and friction is limited to a single point.
- frame: each separate drawing or photo in an animation.
- animation: a series of images that change little by little and, seen quickly, seem to move.
- shutter: something that lets you see for an instant and then covers up; here, the slots.
- cycle: a sequence that ends the same way it starts and can be repeated endlessly.
- images per second: how many drawings you see in one second; cartoons use 12 or 24.
By age
- 5–7 years: The adult cuts the slots and fits the axle and hub. The child colours the ball strip, glues the strips inside and spins it. A simple animation: a face opening and closing its eyes (it only changes in 2–3 frames).
- 8–10 years: They build the drum and their own strip; the adult cuts the slots and uses the hot glue. Short-cycle animations: a bouncing ball, a flower that grows and closes, a fish opening its mouth.
- 11–12 years: Challenge: plan a 12-frame cycle with key positions and in-betweens (like animators do), work out the images per second with a stopwatch and try an 11-frame strip to see the stroboscopic effect.
In a group or in class
Teams of 2–3 (8–10 zoetropes for 25 children), or a single class zoetrope and one drawing strip per child, taking turns. Beforehand: pre-cut floors, walls and slots with a craft knife (this takes the longest) and assemble axles and bases with hot glue. 90-min session: 10 min demonstration with the ball strip, 20 min assembling the drum, 40 min drawing their own strip, 20 min «film festival» showing everyone's strips.
Challenges
- Draw a 12-frame animation that tells a mini story in a loop (a seed that grows, flowers and turns back into a seed).
- Make strips with photos: 12 photos of a modelling-clay figure moving little by little, printed at 50 × 55 mm.
- Add a toy motor with a 1.5 V battery and a rubber-band reduction so it turns on its own at 1 revolution per second.
- Build a praxinoscope: instead of slots, 12 small mirrors in the centre (a variant invented in 1877).