Paper dragon that turns its head
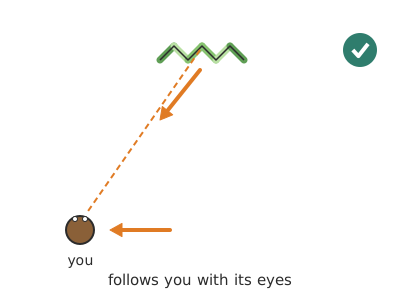
A dragon's head made of card folded in a zigzag with the snout sunk backwards: when you look at it with one eye closed from 1.5–2 m and walk sideways, your brain sees it sticking out and the dragon seems to turn its head to follow you.
What they will learn
- That we see with our brain, not just our eyes: the brain «guesses» depth using what it expects to see.
- What concave (sunk in) and convex (sticking out) mean, and how a mountain or valley fold changes the shape.
- That we perceive depth better with two eyes (stereoscopic vision), which is why the illusion is stronger with one eye closed.
- That shadows and light are depth clues: light from the side can give the trick away.
Prepare beforehand
- Print templates A and B at 100 % («actual size») on card. Check that the strip is 170 mm wide.
- If you're doing this with young children, score the 5 vertical folds yourself with the ruler and the empty pen.
- Set up the test spot: a table or shelf at the child's eye level with 2 m of clear space in front to walk sideways.
- Avoid a strong lamp at the side: ceiling light or a window behind the viewer is better.
Materials and tools
- White card — 1 A4 sheet
180–220 gsm, suitable for printers - Colouring pencils or felt-tip pens — 1 box
greens, yellows and reds for the dragon - Glue stick — 1
to stick the tabs to the base
Tools
- Scissors — cutting out the outline, the horns and the tab cuts
- Ruler — scoring the folds
- Empty ballpoint pen or closed scissor tip — scoring the folds so they bend cleanly
- Printer — printing the template at 100 % adult
Pieces and templates
- A · Dragon's head (zigzag strip) ×1 — card 200 gsm
- B · Base with zigzag guide ×1 — card 200 gsm or thin card
Step by step
Print the template
Print pieces A and B on 200 gsm card at 100 % scale. Check with the ruler that the head strip is 170 mm wide and 90 mm high (not counting the horns or the tab).
1 Print A and B on card at 100 % («actual size») 2 Check with the ruler: 170 mm wide and 90 high Colour the dragon
Colour the face and wings before cutting out: green scales, yellow eyes with black pupils, white teeth. Colour the cheeks slightly lighter than the face: this strengthens the illusion that they stick out towards you.
1 Colour before cutting out: green scales, yellow eyes 2 Colour the cheeks lighter than the face 3 Don't draw shadows: use flat, contrasting colours Tip: Flat, contrasting colours work better than drawn shadows: don't draw shadows that «give away» the hollow.Cut out the outline
Cut out piece A along the solid line, including the two horns at the top. Also cut out base B (130 × 50 mm).
1 Cut along the solid line, including both horns 2 Also cut out base B, 130 × 50 mm Cut the tab
Make 5 cuts of 15 mm in the tab at the bottom, exactly in line with each vertical fold line, up to the horizontal line (not beyond). That way the tab is split into 6 separate little flaps.
1 Mark 5 cuts of 15 mm, one under each fold 2 Cut upwards and stop exactly at the horizontal line 3 Check that each little flap folds separately Check: Each tab flap folds separately.Score the folds
Lay the ruler along each dashed line and go over it firmly with an empty ballpoint pen: the 5 vertical lines and the horizontal one on the tab.
1 Lay the ruler on each line and go over it with an empty pen 2 Score the 5 vertical lines and the one on the tab Tip: A scored fold comes out straight and crisp; unscored, the card bends in a curve and the effect is weaker.Fold the snout back
With the drawing facing you, fold the centre line (between the two eyes) BACKWARDS, so that the drawing ends up on the inside of the fold: the dragon's nose moves away from you. Fold to 90°.
1 With the drawing facing you, find the line between the eyes 2 Fold the centre line back: the nose moves away from you 3 The nose is at the back and the V opens towards you Check: Looking from above, the centre line of the snout is the furthest point of the face: it forms a V that opens towards you.Fold the cheeks forward
Fold the two folds between «face» and «cheek» FORWARD (the fold sticks out towards you like an edge). And fold the two folds between «cheek» and «wing» BACKWARDS. All of them to about 90°.
1 Cheeks forward (red), wings back (green) 2 The cheeks stick out towards you and the wings go back 3 Seen from above: a zigzag of 6 segments Check: Seen from above, the edge of the strip makes a zigzag with 3 points at the back (the two folds between wing and cheek, and the snout) and 2 towards you (cheeks), like a zigzag of 6 segments (one per panel); the ends of the wings are also at the front, level with the cheeks.Fold the tab
Fold each of the 6 tab flaps backwards, horizontally, so the head can stand up resting on them.
1 Fold each tab flap backwards, horizontally 2 The head stands up on its 6 tabs Glue the head to the base
Put glue stick under each tab flap and rest the head on base B following the drawn zigzag: the snout on the back point, in the centre, and the cheeks on the front points. Press each tab for 10 seconds.
1 Put glue stick under each tab flap 2 Rest the zigzag on the guide on B and press for 10 seconds 3 The head stands up on its own, with the snout at the back Check: The head stands up on its own, with the panels at 45° and the snout at the back, 20 mm behind the cheeks.Place it at eye level
Put the dragon on a shelf or on top of a box, so that its face is at the height of your eyes. Step back 1.5–2 m (about 3 adult steps) and stand right in front of it.
1 Put its face at your eye level and step back 1.5–2 m 2 If the table is low, crouch: from above it doesn't work Tip: If the table is low, crouch down: looking at it from above spoils the effect.Close one eye and walk
Cover one eye with your hand and walk slowly sideways, 1 m to the left and 1 m to the right, keeping your gaze on the dragon's eyes. At first it may take a few seconds for your brain to «see» the face sticking out.
1 Cover one eye with your hand 2 Walk slowly sideways, 1 m each way, watching its eyes 3 If you go left, the dragon follows you with its eyes Check: When you «see» it properly, the head seems to turn and follow you with its eyes: if you go left, the dragon looks left.Try with both eyes
Repeat the walk with both eyes open at 2 m and then at 50 cm. Compare: at what distance does the trick stop working?
1 With both eyes at 2 m: it still works 2 At 50 cm you spot the trick: note where it stops working
Does it work? The test
With the dragon at eye level and ceiling light, look from 2 m with one eye closed and walk 1 m each way. Then repeat at 1 m and at 50 cm.
What should happen: At 1.5–2 m with one eye, the head seems to turn as if it were alive, always looking at you. With both eyes the effect also appears from 2–3 m. At less than 50 cm, two-eyed vision reveals the hollow and the illusion disappears.
If something goes wrong
- The dragon doesn't turn, it looks as it really is — You are too close or looking with both eyes. Solution: Step back to 2 m, close one eye and wait 2–3 seconds without moving until the face «pops» out; then walk.
- The head seems to turn the wrong way (away from you) — The folds are reversed: the snout sticks out towards you. Solution: Unfold and refold the centre fold and the wing folds backwards and the cheek folds forwards.
- Shadows show up and give the trick away — Strong light from the side (a lamp or window to one side). Solution: Light it from the front or from above; a window behind you is ideal.
- The head falls over or opens out — Thin paper or uncut tab. Solution: Use 200 gsm card and cut the tab at the 5 folds so each flap lies flat on the base.
- The folds come out rounded — They weren't scored with a ruler. Solution: Score them with an empty pen and a ruler and fold again, pressing with your fingernail.
- It only works now and then — You're looking from above or from below. Solution: Put the dragon exactly at your eye level.
Safety
- Round-tipped scissors for the youngest; an adult can do the horns and the tab cuts.
- When walking with one eye covered, clear the floor of toys and obstacles: you're seeing with only one eye and judge distances less well.
- Glue stick isn't toxic, but make sure they don't put it in their mouths.
The science behind it
For children
Your brain has seen thousands of faces in its life and they all have noses that stick out. So when it sees the dragon's face with its nose sunk backwards, it thinks «that's impossible» and makes up the idea that it sticks out. But then, when you move, what you see doesn't fit a nose that sticks out, and your brain fixes it by deciding that the dragon has turned its head. The dragon is standing still: it's your brain that moves it!
For the adult
This is the hollow-face illusion, popularised in paper by Jerry Andrus with his «dragon». Depth perception combines binocular clues (disparity between the images of each eye) and monocular ones (shading, perspective, prior knowledge). With one eye, or beyond 2–3 m where binocular disparity is small, prior knowledge dominates («faces are convex») and the visual system inverts the depth of the concave snout. As the viewer moves, the motion parallax of a concave object is the opposite of that of a convex one: the near parts of the real object (cheeks) shift on the retina more than the far ones (snout). To make that information consistent with the perceived convex face, the brain concludes that the object is rotating in the same direction as the viewer, so the face seems to follow them. That is why these matter: crisp folds, frontal or overhead lighting (a side light creates shadows incompatible with convexity), the face at eye level and enough distance. The chosen geometry (6 panels of 28.3 mm at 90°) gives the snout a depth of 20 mm relative to the cheeks on a head 120 mm wide.
- optical illusion: an image that the brain interprets differently from how it really is.
- concave: sunk inwards, like the inside of a spoon.
- convex: bulging outwards, like the back of a spoon or a nose.
- stereoscopic vision: seeing depth by comparing what each eye sees.
- valley and mountain fold: a fold that sinks in (valley) or sticks out like an edge (mountain).
By age
- 5–7 years: The adult scores the folds and checks their direction. The child colours, cuts out the easy parts and glues the head to the base. For the test, the adult covers one of the child's eyes with a hand or an eye patch.
- 8–10 years: They do everything on their own. Let them discover what happens if they fold the snout the other way (two dragons, one of each kind) and explain the difference.
- 11–12 years: Let them design their own character on a 170 × 90 mm strip or larger (print at 141 % on A3: the strip becomes about 240 × 127 mm) and measure the minimum distance at which it works with one and two eyes.
In a group or in class
Individual (it's cheap and quick). Print one template per child on card beforehand, plus a spare for every 5. 45-minute session: 10 min colouring, 15 min cutting out and folding, 5 min gluing, 15 min testing. For the test, line up all the dragons on a shelf 1.2 m high and mark a line on the floor with tape at 2 m so the class can walk past sideways with one eye covered. Have a dragon made with the snout sticking out for comparison.
Challenges
- Make a bigger dragon (A3 at 141 %: a strip about 240 mm wide) and check whether the effect can be seen from further away.
- Make two dragons, one with the snout folded back and the other forward, and explain why one follows you and the other dodges you.
- Design your own character with the same 6-panel strip.
- Build Jerry Andrus's complete dragon, with the head shaped like a hollow box.
- Look up the hollow-mask illusion and try it with the inside of a carnival mask.