Thumb flipbook
A little book of 24 sheets measuring 8 × 5 cm stapled along one side: on each sheet the ball is a little further along and, when you flick through the sheets quickly with your thumb, you see it bounce by itself for 1–2 seconds.
What they will learn
- That a film is a series of still images which, shown at more than 12 per second, the brain joins into continuous movement.
- To plan a sequence: start position, end position and the steps in between (the «key frames» and the «in-betweens»).
- That the distance between one drawing and the next is the speed: very close together = slow (at the top of the bounce), far apart = fast (near the ground).
- Real animation tricks: squashing and stretching the ball when it hits so it looks soft and alive.
Prepare beforehand
- Print sheets H01–H24, front cover P and back cover T at 100 % (without «fit to page»). Check that each sheet measures 80 × 50 mm.
- If the children are young, cut them out yourself beforehand: with a craft knife and ruler you can cut the 3 stacked A4 sheets in one go.
- For a made-up animation, print 24 copies of blank sheet HB.
- Get a bright window ready or put your mobile on a white image with the brightness at maximum for tracing.
- Make a sample flipbook yourself: seeing it work before starting is hugely motivating.
Materials and tools
- Printer paper — 3 A4 sheets
80–100 gsm (100 gsm flicks better with your thumb and is still see-through enough for tracing) - Card — 1 piece 8 × 5 cm
160–200 gsm, for the front cover - Thin card — 1 piece 8 × 5 cm
cereal-box card, for the stiff back cover - Pencil — 1
HB, well sharpened - Rubber — 1
soft - Fine black felt-tip pen — 1
0.4–0.8 mm, for going over the lines at the end (much easier to see when flicking fast) - Colouring pencils — 1–2 colours
to colour in the ball the same colour on every sheet - Staples — 2–3
ordinary stapler (26/6) that goes through ≈ 4 mm - Masking tape — 5 cm
19–25 mm wide, to cover the spine
Tools
- Scissors — cut out the sheets along the solid line
- Craft knife, metal ruler and cutting mat — cut several sheets at once with exact edges (optional) adult
- Stapler — staple the pad along the margin adult
- Bulldog clips — hold the pad lined up while stapling
- Window or light box (mobile phone with a white screen) — trace against the light
Pieces and templates
- H01 · Sheet 01 ×1 — paper 80–100 gsm
- H02 · Sheet 02 ×1 — paper 80–100 gsm
- H03 · Sheet 03 ×1 — paper 80–100 gsm
- H04 · Sheet 04 ×1 — paper 80–100 gsm
- H05 · Sheet 05 ×1 — paper 80–100 gsm
- H06 · Sheet 06 (stretched ball) ×1 — paper 80–100 gsm
- H07 · Sheet 07 (squashed ball) ×1 — paper 80–100 gsm
- H08 · Sheet 08 ×1 — paper 80–100 gsm
- H09 · Sheet 09 ×1 — paper 80–100 gsm
- H10 · Sheet 10 ×1 — paper 80–100 gsm
- H11 · Sheet 11 ×1 — paper 80–100 gsm
- H12 · Sheet 12 ×1 — paper 80–100 gsm
- H13 · Sheet 13 ×1 — paper 80–100 gsm
- H14 · Sheet 14 ×1 — paper 80–100 gsm
- H15 · Sheet 15 (stretched ball) ×1 — paper 80–100 gsm
- H16 · Sheet 16 (squashed ball) ×1 — paper 80–100 gsm
- H17 · Sheet 17 ×1 — paper 80–100 gsm
- H18 · Sheet 18 ×1 — paper 80–100 gsm
- H19 · Sheet 19 ×1 — paper 80–100 gsm
- H20 · Sheet 20 ×1 — paper 80–100 gsm
- H21 · Sheet 21 ×1 — paper 80–100 gsm
- H22 · Sheet 22 (stretched ball) ×1 — paper 80–100 gsm
- H23 · Sheet 23 (squashed ball) ×1 — paper 80–100 gsm
- H24 · Sheet 24 ×1 — paper 80–100 gsm
- HB · Blank sheet (for your own animation) ×24 — paper 80–100 gsm
- P · Front cover ×1 — card 160–200 gsm
- T · Stiff back cover ×1 — thin card (cereal box)
Step by step
Cut out the sheets
Cut out the 24 sheets (H01–H24), front cover P and back cover T along the solid line. Each piece measures 80 × 50 mm: check a couple with the ruler.
1 Cut out each sheet along the solid line 2 Check with the ruler that it measures 80 × 50 mm 3 Put together the 24 sheets, front cover P and back cover T Tip: Cut slowly and just inside the line: if some sheets come out bigger than others, the pad will not flick well.Put the pad in order
Stack the sheets in order: back cover T at the bottom, sheet 24 on top of it, then 23… and at the very top 01 and front cover P. The numbers should all be on the left, in the margin.
1 Stack: T at the bottom, then 24, 23… and 01 and front cover P on top 2 Run over the corners: the numbers follow on with no gaps Check: Run your finger over the corners: the numbers should go 01, 02, 03… with no gaps.Draw sheet 24 first
Take out sheet 24 and draw the final ball following the dotted circle (Ø 8 mm, resting on the ground). Also go over the ground line in pencil.
1 Take out sheet 24: the final ball is at the bottom, resting on the ground 2 Draw the ball over the circle and go over the ground line 3 Now you know where the film ends Tip: That way you always know where the movement ends.Trace backwards
Put sheet 23 on top of 24, edges well lined up, and hold them against the window. Draw the ball in the dotted circle on 23: you will see 24 through it and notice how much it moves. Carry on like this: 22 on 23, 21 on 22…
1 Put 23 on top of 24 against the window, edges lined up 2 Draw the ball on 23 over its dotted circle 3 From sheet to sheet the ball moves only a little: about 11 mm at most Check: From one sheet to the next the ball moves only a little: about 11 mm at most (the biggest jump is from 06 to 07, just before the impact). If on any sheet it is much further apart, check that you are drawing on its circle.Squash and stretch
On sheets 07, 16 and 23 the ball touches the ground: draw it squashed (an 11 × 6 mm oval). On 06, 15 and 22, just before the impact, draw it stretched downwards (a 7 × 10 mm oval).
1 Just before the impact, draw it stretched: 7 × 10 mm 2 When it touches the ground, draw it squashed: 11 × 6 mm 3 Round, stretched, squashed and round again: it looks like rubber Tip: This trick used by professional animators makes the ball look like rubber.Finish the 24 sheets
Keep going until sheet 01 (the ball at the top left). Notice: at the top of the bounce the balls are very close together (it is moving slowly) and near the ground they are far apart (it is moving fast).
1 Keep tracing until sheet 01, at the top left 2 At the top the balls are close together; near the ground, far apart Go over the lines and colour in
Go over the outline of each ball with a fine felt-tip pen and colour it in the same colour on all 24 sheets. Rub out any leftover pencil marks once the ink is dry (1 minute).
1 Go over the outline of the ball with a fine black felt-tip pen 2 Colour it in and rub out the pencil once the ink is dry 3 The same colour and the same line on all 24 sheets Check: All 24 balls should be the same colour and have the same line thickness: if one is different, it «flickers» when you flick through.Line up the edges
Stack everything in order again (T at the bottom, 24…01, P on top). Tap the pad on its edge against the table, first on the left side and then on the bottom, until all the edges are lined up. Hold it with a clip in the margin.
1 Tap the pad on its edge against the table on the spine side 2 Then tap it on the bottom until the edges match 3 Hold the pad with a clip in the margin Staple the margin adult
Put 2 staples in the 15 mm margin, 7 mm from the left edge: one 10 mm from the top edge and the other 10 mm from the bottom. Check that they go through all 26 sheets.
1 Mark 2 staples 7 mm from the spine and 10 mm from the top and bottom 2 The adult presses the stapler all the way down on the margin 3 The legs must come out through the back cover and lie flat Tip: If the stapler does not go through, open it out and staple onto a large rubber, then bend the legs over by hand, or use a 19 mm bulldog clip.Cover the spine
Cut a 5 cm strip of masking tape (the length of the spine) and stick it along the left margin, with half its width on the front cover. Fold it round the spine and stick the other half on the back, over the back cover, to cover the staples. That way the sheets do not tear and nothing scratches.
1 Stick the tape along the spine, half on the front cover 2 Fold the tape round the spine and stick it on the back too 3 The staples are covered and do not scratch Practise the movement
Hold the spine with your left hand. Rest your right thumb on the right-hand edge, bend the pad upwards and slide your thumb slowly down the edge: the sheets slip away one at a time, first the front cover and 01 and finally 24, in about 2 seconds.
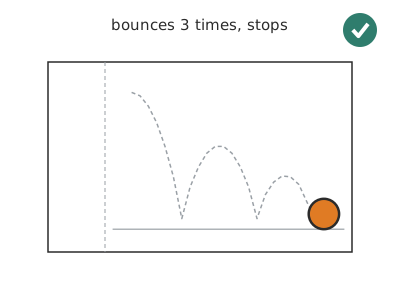
1 Hold the spine with your left hand and the edge with your thumb 2 Bend the sheets upwards and let them slip away one at a time 3 The ball falls, bounces three times and stays still Check: The ball falls, bounces three times and stays still. If it goes backwards, you are flicking the sheets the wrong way.
Does it work? The test
Flick through the pad with your thumb 3 times: once very slowly (1 sheet per second), once at normal speed (≈ 2 s in total) and once very fast (< 1 s).
What should happen: Slowly you see separate drawings. At ≈ 12 sheets per second (2 s for all 24) the ball falls and bounces smoothly, each bounce lower, and stops on sheet 24. Very fast, the movement lasts so short a time that it is hard to follow.
If something goes wrong
- The ball jumps abruptly — On one sheet it moved too much or a sheet is out of order. Solution: Check the numbers in the margin and redraw the sheet that stands out; the distance between consecutive balls should not be more than about 11 mm (the jump from 06 to 07).
- The drawing wobbles even though the ball is right — Sheets cut to different sizes or badly lined up when stapling: the ground «dances». Solution: Cut the sheets stacked together with a craft knife and ruler, and tap the pad on the table before stapling.
- The sheets do not go one at a time; they all slip away together — Very thin paper or the thumb is holding too much of the edge. Solution: Use 100 gsm paper or add the cardboard back cover; bend only 2–3 mm of the edge with your thumb.
- The ball goes backwards — The sheets are being flicked from 24 to 01. Solution: Flick them from the front cover towards the back cover, or reverse the movement.
- The stapler does not go through — 26 sheets with card (≈ 4 mm) are too much for some school staplers. Solution: Use a 19 mm bulldog clip or 2 rubber bands on the margin.
- You can hardly see the drawing when flicking fast — Pencil line too thin or too light. Solution: Go over it with a black felt-tip pen and colour it in: when moving, only high-contrast patches can be made out.
Safety
- The stapler is used by an adult or by an older child under supervision: do not put fingers under the head.
- The craft knife is for the adult only, with a metal ruler and cutting mat.
- Cover the staples with tape so they do not scratch when holding the pad.
- If you trace using a mobile phone as a light box, do not rest it on your lap for long (it gets hot) and turn the brightness down afterwards.
The science behind it
For children
Your eyes are like a camera that keeps each picture for a tiny moment. If the pictures arrive very quickly, one after another, your brain joins them together and thinks the ball is really moving. But they are only 24 still drawings! Cartoons are made the same way, with lots and lots of drawings that change a tiny bit each time.
For the adult
The effect is often put down to «persistence of vision» (the retina holds the image for ≈ 1/15–1/10 s), but the current explanation combines two perceptual phenomena: flicker fusion (images look continuous above a certain frequency) and beta/phi apparent motion, whereby the visual system interprets two successive, displaced stimuli as a single moving object, provided the displacement and the interval are small. From 10–12 images/s the movement is perceived as smooth (cinema uses 24 fps). The printed trajectory is real physics: uniformly accelerated fall (y = ½·g·t²), impacts with a coefficient of restitution of 0.75 (each bounce leaves with 75 % of the speed and rises ≈ 56 % of the previous height) and constant horizontal speed. That is why the positions spread out near the ground and bunch together at the vertex of the parabola («ease in / ease out»). Squash and stretch (one of Disney's 12 principles of animation) preserves the apparent volume and conveys elasticity. The flipbook (kineograph) was patented by John Barnes Linnett in 1868.
- frame: each of the drawings or photos that make up a film.
- animation: the technique of creating a sense of movement with still images shown very quickly.
- persistence of vision: the eye and the brain keep each image for a fraction of a second.
- frames per second: how many drawings you see in one second; cinema uses 24.
- trajectory: the path an object follows as it moves.
By age
- 5–7 years: They use the sheets printed with the guide ball: they only go over and colour in the circle on each sheet. The adult cuts out, orders and staples. Focus on the movement of flicking through the sheets.
- 8–10 years: They cut out, trace against the light from 24 backwards and add the squash. Then they invent a simple animation with the blank sheets (a flower growing, a rocket taking off).
- 11–12 years: They design their own trajectory with the blank sheets: first they plan the 24 positions on a strip of paper (key frames and in-betweens) and work out the duration at 12 fps.
In a group or in class
Individual (each child makes their own flipbook), at tables of 4 with a pair of scissors per child and a stapler and a clip per table. Beforehand: print 3 A4 sheets per child and, for the little ones, cut them out stacked with a craft knife. 60 min: 5 min demonstration with a sample flipbook, 15 cutting out, 30 drawing (tracing on the window in turns or using tablets/mobiles as light boxes) and 10 stapling and the «premiere». At the end, record a video of the class flicking through all the flipbooks.
Challenges
- Make the ball bounce against a wall and come back to the left.
- Create a 48-sheet flipbook in which a character walks from one side to the other.
- Draw an animation that works in a loop: sheet 24 links up with 01 (a turning wheel, a flame).
- Hide a flipbook in the corner of a school exercise book using pages 1 to 40.