Vibrating dancing robot
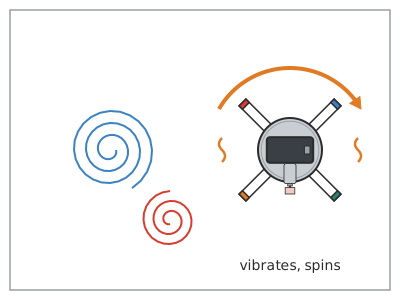
A robot about 15 cm tall standing on four felt-tip pen legs: a motor with an off-centre weight makes it vibrate, spin and wander across the table on its own, and if you take the caps off it draws spirals wherever it dances.
What they will learn
- That a mass spinning off-centre produces a force that changes direction very quickly: that is a vibration.
- That vibration, with slanted legs and friction, turns into movement and spinning.
- How to build a simple closed circuit with batteries, a switch and a motor, and that swapping the wires makes the motor turn the other way.
- That a low centre of gravity and a wide base stop a robot from tipping over.
Prepare beforehand
- Test the motor before the session: join its wires to the battery holder's wires and check it spins strongly.
- Print pieces A at 100 % and check the red 50 mm line in the header.
- Cut and pierce the erasers (weights) in advance if the children are young.
- Cover the table with the large paper and only take the caps off the pens when it is time to test.
- Make sure the batteries are new: with flat batteries the robot barely moves.
Materials and tools
- DC motor, type 130 — 1 buy
1.5–6 V, 2 mm shaft, with two wires soldered on (red and black) - 2 × AA battery holder with switch — 1 buy
3 V output with red (+) and black (−) wires, ≈ 58 × 32 × 15 mm - AA batteries — 2
1.5 V alkaline (or 1.2 V rechargeable, a little slower) - Large lid — 1
from a jar or tin, Ø 70–85 mm (cocoa, large jam jar) - Thick felt-tip pens — 4
identical, ≈ 13 cm long and Ø 10–15 mm, washable (they can be nearly dry if they only dance) - Card — 1 A4 sheet
250–300 gsm, or cereal-box card - Eraser — 1 piece, 20 × 12 × 8 mm
soft (crumbly type), for the off-centre weight - Electrical tape or masking tape — ≈ 1 m
for the legs and wire joints - Glue sticks — 1–2
for the hot glue gun - Googly eyes — 2 buy
self-adhesive, 10–15 mm - Large paper — 1 sheet, 50 × 70 cm
wrapping or drawing paper, so the robot can draw without making a mess
Tools
- Scissors — cut out the skirt and the tape
- Hot glue gun — fix the motor, battery holder and skirt to the lid adult
- Craft knife — cut the eraser to size adult
- Pin or thick needle — make the pilot hole in the eraser for the shaft adult
- Glue stick — stick the template onto the card
Pieces and templates
- A · Cone skirt (half cone) ×2 — card 250–300 gsm
- B · Platform (if you have no lid) ×1 — corrugated cardboard 3 mm
- C · Off-centre weight ×1 — eraser
Step by step
Test the motor
Put the 2 AA batteries in the holder. Twist the holder's red wire with one motor wire and the black one with the other (3 turns each). Switch on: the shaft should spin fast. Switch off.
1 Put the 2 AA batteries in the holder, with + and − the right way 2 Twist the red with one motor wire and the black with the other 3 Switch on: the shaft spins fast. Then switch it off Check: If it doesn't spin, check the batteries, the switch and that the copper (not the plastic) is touching.Make the off-centre weight adult
Cut a 20 × 12 × 8 mm piece of eraser. Make a pilot hole with a pin 4 mm from one end (piece C) and push the eraser onto the motor shaft until about 6 mm goes in. Fix it with a drop of hot glue.
1 Cut a 20 × 12 × 8 mm piece of eraser with the craft knife 2 Make the pilot hole with a pin 4 mm from one end 3 Push it 6 mm onto the shaft, add glue and turn it: it's to one side Check: Turn the shaft with your fingers: the eraser goes round like a little flag, almost all to one side.Cut out the skirt
Stick template A onto the card and cut out both halves along the solid line. Curve each one by drawing it over the edge of the table so it takes on a cone shape.
1 Stick template A onto the card with a glue stick 2 Cut out both halves along the solid line 3 Draw it over the table edge, pulling downwards, to curve it Assemble the cone
Using a glue stick or PVA glue, stick the tab of one half under the edge of the other, then close the cone with the second tab. Reinforce both joins with tape inside and out.
1 Glue each tab under the edge of the other half 2 Reinforce each join with tape inside and out 3 Check: about 84 mm at the bottom, 60 mm at the top and 35 tall Check: Standing on the table, the cone measures about 84 mm across at the bottom and 60 mm at the top.Glue the lid on top adult
Place the large lid upside down (or platform B) centred over the small opening of the cone and glue it with a bead of hot glue all round the join.
1 Place the lid upside down, centred over the small opening 2 Glue it with a bead of hot glue all round the join 3 The same amount of lid sticks out on each side: it's centred Attach the legs
Decide where the motor will go (back) and where the eyes will go (front, on the opposite side). Place a felt-tip pen flat along the cone, tip down, with its top end level with the lid, an eighth of a turn (45°) from the motor's spot. Fix it with 2 strips of 8 cm tape that wrap round the pen and the cone. Repeat with the other 3, a quarter turn (90°) apart: the motor and the eyes each end up in the gap between two legs.
1 Place a pen along the cone, level with the lid 2 Hold it with 2 strips of 8 cm tape wrapped round pen and cone 3 Put the other 3 a quarter turn apart: from above, a cross Check: The robot stands up with all 4 tips on the table and doesn't rock if you push it gently.Tip: Look at the robot from above: the 4 legs should form an X, with the motor's spot right between two of them. Stand it up and check it doesn't wobble.Secure the legs adult
Put a drop of hot glue between each pen and the cone at the top, and wrap one full turn of electrical tape round the 4 legs and the cone, halfway up the cone.
1 Put a drop of hot glue at the top, between each pen and the cone 2 Wrap a turn of electrical tape round the 4 legs and the cone 3 Shake it a little: the legs don't move Check: When you shake the robot, the legs don't move.Fix the battery holder adult
Stick the battery holder on top of the lid, centred and with the switch within reach, using two dots of hot glue or thick double-sided tape.
1 Put two dots of hot glue in the centre of the lid 2 Press it down centred, with the switch within reach Tip: Centring it matters: it's the heaviest part (≈ 60 g with batteries) and it sets the robot's balance.Fix the motor at the edge adult
Lay the motor on its side on the lid with the shaft pointing outwards, in the gap between two legs (halfway between them, never on top of one), so that the weight sticks out about 15 mm beyond the edge of the lid and spins without touching the lid or the legs. Glue it with hot glue and a strip of tape wrapped round it.
1 Lay the motor at the edge, with the weight 15 mm outside 2 Glue it with hot glue and wrap a strip of tape round it 3 Turn the weight with your finger: full turn, no rubbing Check: Turn the weight with your finger: it goes all the way round without rubbing anything.Tip: The 15 mm is measured from the edge of the lid, whatever its size: with a small lid (Ø 70) the motor sits further out, but its body must still rest at least 20 mm on the lid. If it rests less, use a bigger lid or platform B.Tidy the wires
Cover each twisted wire joint with a 3 cm piece of electrical tape and tape the spare wire to the lid, away from the weight.
1 Cover each twisted joint with 3 cm of electrical tape 2 Tape the spare wire to the lid, away from the weight Check: No wire hangs near the spinning weight.Decorate
Stick the googly eyes on the side opposite the motor (the character's «front») and draw a face or add light card antennae (less than 5 g in total).
1 Stick the eyes opposite the motor: that's the front 2 Draw the face and add light antennae (under 5 g) Let's dance!
Put the robot on the large paper, take the caps off the pens and switch on. The robot vibrates, spins and moves about, drawing spirals. Switch it off by picking it up by the lid.
1 Put it on the large paper and take off the 4 caps 2 Switch on: it vibrates, spins and draws spirals on the paper 3 To stop it, pick it up by the lid and switch it off Check: It moves on its own for several minutes without tipping over.
Does it work? The test
On paper on a smooth table, switch the robot on for 30 s and look at the drawing it leaves and how far it has travelled.
What should happen: With new batteries the robot spins on the spot and moves forward in curves, leaving spirals and loops; it covers roughly 20–50 cm in 30 s. Swapping the motor wires changes the direction the dance turns.
If something goes wrong
- The motor spins but the robot doesn't move — Weight too small or almost centred on the shaft. Solution: Use a bigger eraser and push the shaft in closer to one end, or glue a nut on the far end.
- The robot tips over — Legs not splayed enough, weight off-centre or the spinning weight too big. Solution: Check that the battery holder is centred, splay the legs more (add a bottle cap between cone and leg) or trim the eraser.
- The motor doesn't spin — Flat batteries, switch off or a loose wire joint. Solution: Test the motor directly with the battery holder; redo the joints, twisting the copper together firmly.
- The motor hums but doesn't start — The weight is rubbing on the lid, a leg or a wire. Solution: Move the motor further out until the weight spins freely.
- It only spins on the spot without moving forward — The legs are exactly the same and symmetrical: the vibration doesn't push in any direction. Solution: Raise or lower one leg slightly (5 mm) to break the symmetry: the robot will start to move about.
- The weight flies off — Not enough hot glue or the hole is too big. Solution: Make a new hole with a pin (smaller than the shaft) and fix it with hot glue. Keep faces away when testing it.
Safety
- The weight spins at several thousand revolutions per minute: keep faces and long hair away and switch the robot off before touching the motor.
- Hot glue and craft knife: always an adult.
- Only use AA batteries in their holder; don't use coin cells with young children (they are very dangerous if swallowed) and don't short-circuit the battery holder (it gets hot).
- Googly eyes and batteries are small parts: keep out of reach of children under 3.
- Uncapped felt-tip pens stain: use washable ones and put paper underneath.
The science behind it
For children
Inside the robot there's a motor that spins incredibly fast, and on its tip it has a piece of eraser stuck on just one side. It's like when you whirl a string with something on the end: it pulls your hand one way and then the other. That tug changes so quickly that the whole robot shakes. Because the legs are slanted and rub against the table, each shake pushes it a tiny bit, and with lots of shakes in a row the robot dances!
For the adult
A mass m rotating at a distance r from the axis with angular velocity ω requires a centripetal force F = m·r·ω², and by reaction the motor receives a force of the same magnitude that rotates with the mass (unbalanced rotating force). With m ≈ 2 g, r ≈ 6 mm and the motor at ≈ 5000 rpm (ω ≈ 520 rad/s) under load, F ≈ 3 N, more than the robot's weight (≈ 1.3 N for 130 g): that is why the robot briefly lifts its legs off the table. Because the force is applied at the edge and high up, it also produces a torque that makes the robot turn on its legs. The slanted legs turn the vibration into forward motion: in each cycle the leg is unloaded and slips in one direction more than the other (static versus kinetic friction), the same principle as «bristlebots». The circuit is a 3 V battery (2 × AA in series), a switch and a DC motor drawing ≈ 0.3 A; reversing the polarity reverses the rotation and, with it, the direction of the dance. A CR2032 has an internal resistance of about 10–20 Ω, so it cannot deliver that current.
- vibration: a very fast back-and-forth movement.
- eccentric: not in the centre; an eccentric weight spins unbalanced.
- circuit: a closed path along which electricity flows from the battery to the motor and back.
- friction: a force that appears when two surfaces rub together and that slows movement down.
- centre of gravity: the point where all the weight of an object seems to be concentrated.
By age
- 5–7 years: The adult fits the weight, the motor and the battery holder with hot glue and makes the cone. The child tapes on the legs, joins the wires by twisting them and decorates. Focus on «the off-centre eraser makes it shake».
- 8–10 years: They build everything except the hot glue and craft knife work. Let them discover for themselves what happens when they move the weight or a leg, and write it down.
- 11–12 years: Have them calculate the force F = m·r·ω² by weighing the eraser on kitchen scales and assuming 5000 rpm. Challenge: build the mini version with a coin vibration motor, a CR2032 cell and a toothbrush head («bristlebot»).
In a group or in class
Pairs, one robot per pair (motor + battery holder ≈ €2–3 per robot). Beforehand: test all the motors, cut the weights, print pieces A on card and fit the motors with the weight already glued on. 60-minute session: 10 min demonstration, 35 min building, 15 min «dance floor» on a paper roll on the classroom floor and a race to leave the circle. Have 2 spare motors, weights and batteries. Just one hot glue gun per table, handled by the teacher.
Challenges
- Get the robot to move more or less straight for 30 cm.
- Build a 3-legged robot and compare it with the 4-legged one.
- Make the robot draw a flower: choose 4 colours and try changing the height of the legs.
- Add a second motor with a weight on the other side and find out what happens if they spin in the same direction or in opposite directions.
- Design a cardboard arena with obstacles and get the robot to go round it without getting stuck.