Six-legged jointed spider
A 13 cm cardboard spider with 6 jointed legs (hip and knee made with split pins) and a vibration motor powered by a coin cell: switch it on and it shakes and moves forward in little hops, and by changing the angle of the legs you decide where it goes.
What they will learn
- That an off-centre spinning weight (an eccentric) makes everything attached to it vibrate.
- How slanted legs turn vibration into forward movement: each shake pushes in the direction the legs ‘point’.
- What a joint with one degree of freedom is (hip and knee turn in a single plane).
- A simple circuit with a battery, switch and motor, and what happens when you reverse the polarity (the motor spins the other way and the spider turns the other way).
Prepare beforehand
- Print the templates at 100 % and check that femur C measures 50 mm.
- Test the motor first of all: join its wires to the battery holder's, switch on and check that it vibrates strongly.
- Pre-cut the 12 leg strips (15 mm wide) with a craft knife and ruler if the children are young: they must come out exactly the same.
- Keep the coin cell in its blister pack until the last step and out of reach of children under 6.
- Have a smooth, hard surface for testing (table, tiled floor): it won't move on a rug.
Materials and tools
- Corrugated cardboard — 1 piece of 20 × 20 cm
single-wall, 3 mm, flat - Split pins (paper fasteners) — 12 + 2 spare
15–20 mm legs, Ø 6–8 mm head - 3 V vibration motor — 1 buy
cylindrical Ø 6–7 × 12–15 mm with an eccentric brass counterweight and soldered wires (phone type), 1.5–3 V, 60–80 mA - CR2032 coin cell — 1 buy
3 V lithium, new - CR2032 battery holder with switch — 1 buy
with 10–15 cm red and black wires (≈ 30 × 25 mm) - Thin wire or cable — 20 cm
thin cable stripped 1 cm at each end, to extend the wires if they don't reach - Sticky tape and electrical tape — 1 roll of each
electrical tape to cover the joins - Glue sticks for a glue gun — 1–2
for a hot glue gun - Googly eyes — 2
self-adhesive, Ø 8–10 mm
Tools
- Craft knife, metal ruler and cutting mat — cutting the strips for the legs adult
- Scissors — cutting out the body and hips
- Awl or wooden skewer — 2 mm holes for the split pins adult
- Hot glue gun — gluing the hips, motor and battery holder adult
- Empty ballpoint pen — scoring the folds on the hips
Pieces and templates
- A · Body (hexagon) ×1 — corrugated cardboard 3 mm
- B · Hip (L-bracket) ×6 — corrugated cardboard 3 mm
- C · Femur ×6 — corrugated cardboard 3 mm
- D · Tibia ×6 — corrugated cardboard 3 mm
Step by step
Test the motor adult
Twist the motor's red wire with the battery holder's red one and black with black (3 turns of copper). Put in the CR2032 with the + facing up and switch on: the motor should buzz and vibrate in your hand. Switch off.
1 Twist red with red and black with black, 3 turns of copper 2 Put in the CR2032 with the + facing up 3 Switch on: it should buzz and vibrate in your hand; then switch off Check: If it doesn't vibrate, check the joins and that the battery is new before carrying on.Cut out the body and hips
Stick the templates onto the cardboard and cut out hexagon A (60 mm from point to point) and the 6 hips B (20 × 28 mm). Copy the 6 radial lines of the body onto the underside.
1 Stick the templates onto the cardboard 2 Cut out hexagon A along the line; then the 6 hips B 3 Copy the 6 radial lines onto the underside of A; B is 20 × 28 mm Cut out the legs adult
Cut 6 femurs C of 15 × 50 mm and 6 tibias D of 15 × 55 mm with a V-shaped point, all with the corrugations running lengthways. Stack them: they must be identical.
1 Cut 15 mm strips with a metal ruler and craft knife, flutes lengthways 2 Cut 6 femurs C (15 × 50 mm) and 6 tibias D (15 × 55 mm) 3 Stack them: the 6 tibias must match to the millimetre Check: The 6 stacked tibias match to the millimetre.Make the holes adult
Pierce the marked holes (2 per femur, 1 per tibia, 1 per hip) with the point of a wooden skewer: they should be about 2 mm, smaller than the split pin, so the joint is stiff.
1 Find the marks: 2 per femur, 1 per tibia and 1 per hip 2 Pierce by twisting the point of a skewer over a soft surface 3 Make holes of about 2 mm: the split pin should be a tight fit Glue the hips under the body adult
Fold each hip B along its fold line to 90°. Glue the short part (20 × 10 mm) under the body on each radial line, with the hole facing outwards; the long part hangs down vertically. Near the corner the flap sticks out a little beyond the edge of the hexagon: trim that corner flush so it sticks down fully.
1 Fold each hip B along its fold line to 90° 2 Glue the short part under A, with the hole facing outwards 3 From below, the 6 hips form a star Check: Looking at the body from below, the 6 hips form a star, like the spokes of a wheel.Assemble the knees
Join each femur to its tibia with a split pin through the knee hole: the femur on the outside, the tibia on the inside. Open out the legs of the split pin and press them down firmly against the cardboard.
1 Join femur and tibia at the knee: C on the outside, D on the inside 2 Open out the split pin's legs and press them flat against the cardboard 3 The tibia turns when pushed and stays where you leave it Check: The tibia only turns if you push it with your finger, and it stays where you leave it.Assemble the hips
Join the other hole of each femur to a hip with a split pin, with the femur on the outside of the hip. Press the legs of the pin down as for the knees.
1 Join the femur's other hole to the hip, with C on the outside 2 Press the pin's legs flat: the femur turns stiffly and doesn't drop on its own Pose the legs
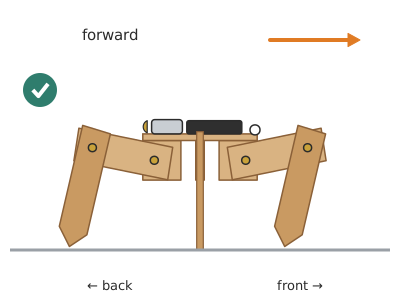
Turn each femur until it is almost horizontal, rising just slightly outwards (about 10°: any more and its edge hits the body). Turn each tibia until it comes down almost vertically to the table. Adjust all 6 until the body is level, about 5 cm above the table.
1 Turn each femur until it rises slightly outwards 2 Turn each tibia until it comes down almost vertically to the table 3 Adjust all 6 until the body is level and doesn't wobble Check: The spider stands up on its own and doesn't wobble when you press gently on it from above.Glue on the battery holder adult
Glue the battery holder with its switch in the centre of the top of the body with a drop of hot glue or double-sided tape, with the switch facing to one side so you can reach it.
1 Put a drop of hot glue in the centre of A and press the battery holder on 2 Leave the switch facing to one side, within easy reach Glue on the motor adult
Glue the motor onto the rear half of the body, in the middle and lengthways, with the shaft facing backwards. Put hot glue only on the motor body (not on the counterweight). The counterweight must stick out 5 mm beyond the rear edge so it can spin without touching anything.
1 Motor on the rear half, lengthways, with the shaft facing backwards 2 Hot glue only on the motor body; the weight sticks out 5 mm 3 Turn the weight with your finger: it spins freely, without rubbing Check: Turn the counterweight with your finger: it spins freely, without rubbing on wires or cardboard.Tidy the wires
If the motor wires don't reach the battery holder, extend them with thin wire by twisting the copper and covering each join with electrical tape. Tape any spare wire to the body so it doesn't hang down to the legs.
1 If they don't reach, extend with wire and cover the join with electrical tape 2 Tape the wires to the body so they don't hang down to the legs Add the eyes
Stick the two googly eyes on the front edge of the body (the side marked FRONT), 15 mm apart.
1 Stick the googly eyes on the FRONT edge 2 Leave 15 mm between the centres of the two eyes Switch on and adjust
Put the spider on a smooth table and switch on. If it goes round in circles, tilt the front and rear tibias on one side back another 10°, or swap the two motor wires (this changes the direction of spin). If it doesn't move forward, tilt the 4 front and rear tibias back by about 15° (the middle pair turn sideways: leave them vertical); the spider goes the way the knees ‘point’.
1 Put it on a smooth table and turn the switch on 2 If it goes in circles, tilt one side's tibias more or swap the wires 3 Tilt the tibias back: it moves the way the knees point Tip: Make one change at a time and test for 10 seconds each time.
Does it work? The test
On a smooth table, mark a start and a finish 50 cm apart. Switch on and time it. Repeat after adjusting the legs.
What should happen: The spider buzzes as it vibrates and moves forward in little hops at about 1–3 cm/s, covering 50 cm in 20–50 s, drifting off line a little. With a new battery it runs continuously for about 30–60 minutes.
If something goes wrong
- The motor doesn't vibrate — Flat battery or battery in the wrong way round, loose join or switch off. Solution: Check that the battery's + faces up, redo the joins and test the motor on its own.
- It vibrates but doesn't move — Legs too vertical or too symmetrical, or the spider is too heavy for the motor. Solution: Tilt the front and rear tibias back by about 15° (the middle pair can only turn sideways: leave them vertical). Remove heavy decorations; the spider should weigh less than 30 g.
- It always goes round in circles — The legs on one side are tilted more, or the motor is off-centre. Solution: Even out the legs, or compensate by tilting the ones on the other side. Swapping the motor wires reverses the direction of turn.
- The legs fold and the spider collapses — Loose split pins or holes too big. Solution: Press the pin's legs down harder, add a cardboard washer, or put a dot of glue on the joint once the leg is posed.
- It makes a rubbing noise and stops — The counterweight is touching the cardboard or a wire. Solution: Unstick the motor and glue it back with the counterweight sticking out 5 mm beyond the edge.
- It works for a few minutes and then gets weaker — Coin cells don't cope well with high currents and get ‘tired’. Solution: Switch off for 1–2 minutes and it partly recovers; use a new battery or two LR44s in series.
Safety
- Coin cell: SERIOUS DANGER if swallowed (internal burns in less than 2 hours). Keep it out of reach of children under 6, have an adult put the battery in and take it out, and dispose of used ones at a battery recycling point. If you suspect a child has swallowed one, go to A&E immediately.
- Split pins, googly eyes and the motor are small parts: not suitable for children under 3.
- The craft knife and awl are used by an adult, with a cutting mat and metal ruler.
- Hot glue burns: the adult applies it, the child points to where it goes.
- Don't touch the motor's counterweight while it is spinning, and tie back long hair.
The science behind it
For children
Inside the motor there is a shaft that spins really fast, and on the end it has a weight stuck on one side only, like a badly made spinning top. As it spins, the weight pulls the motor one way and then the other lots and lots of times a second, and the whole spider shakes. Because its legs are slanted, each shake makes it take a tiny hop the way the legs are pointing, just like when you hop on one leg leaning over. Hundreds of little hops a second make the spider walk!
For the adult
The vibration motor carries an eccentric mass (m ≈ 0.2–0.5 g at ≈ 1–2 mm from the shaft) spinning at 8000–12 000 rpm (≈ 150–200 Hz). The centrifugal force F = m·ω²·r rotates with it (≈ 0.2–0.5 N, several times the weight of the ≈ 25 g spider ≈ 0.25 N), so on each revolution the spider is briefly unloaded or lifts off the ground. When the legs are slanted, the ground reaction at each contact has a horizontal component and the friction is asymmetric: the leg ‘digs in’ when pushing one way and slides the other way (the same principle as bristlebots). The net result is forward movement in the direction the legs are slanted, plus a turning component that depends on the motor's direction of rotation (the reaction torque and the phase of the force relative to each leg), which is why reversing the polarity changes the turn. Electrically it is a series circuit: CR2032 cell (3 V nominal, internal resistance ≈ 10–20 Ω) → switch → motor (≈ 30–40 Ω, 60–80 mA). The drop across the internal resistance leaves ≈ 2–2.5 V across the motor, enough for a 3 V vibration motor; a 130 motor (≈ 2–3 Ω) would demand currents the cell cannot supply. The joints are one-degree-of-freedom revolute pairs with enough friction to hold their pose (like a camera tripod): the torque exerted by the weight at the hip, ≈ 0.04 N × 30 mm ≈ 1 mN·m, is resisted by the friction of a tight split pin.
- eccentric: weight that spins off-centre and makes the motor vibrate.
- vibration: very fast back-and-forth movement.
- joint: connection that lets two pieces turn, like your knee.
- polarity: which is the + terminal and which the −; if you swap them, the motor spins the other way.
- circuit: closed path that electricity flows round.
By age
- 5–7 years: Not recommended for them to make alone because of the coin cell and small parts. The adult assembles the spider and the child poses the legs, adds the eyes and decorates it.
- 8–10 years: The adult makes the holes, does the hot glue and handles the battery; the child cuts, assembles the joints and adjusts the legs.
- 11–12 years: Full assembly with supervision. Challenge: measure the speed at different angles and make a graph, or design 3-segment legs.
In a group or in class
Pairs, one spider per pair (≈ €3 for motor, battery and holder). Beforehand: pre-cut the leg strips, test all the motors and keep the batteries in an envelope controlled by the teacher. 90-minute session: 10 min demonstration of the eccentric (loose motor in the hand), 55 min assembly, 25 min adjustments and a race on a 1 m cardboard track with sides. Have 2 spare motors and 2 spare batteries.
Challenges
- Make the spider travel in a straight line along a 1 m track without touching the sides.
- Add a cardboard bumper at the front so it bounces off walls and keeps walking.
- Design a different insect (beetle, centipede) with the same motor.
- Fit two motors, one on each side, with separate switches so you can steer at will.