Scribble-drawing robot
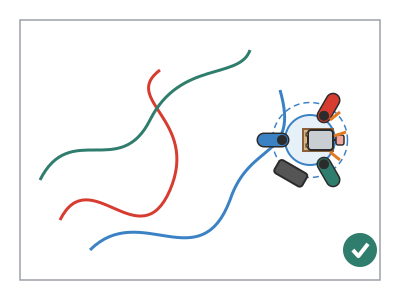
An upside-down plastic cup with three felt-tip pens as legs and a motor with an off-centre counterweight on top: when you switch it on, it vibrates, hops along and draws spirals and scribbles on a large sheet of paper.
What they will learn
- That an off-centre spinning mass produces a force that keeps changing direction (centrifugal force) and makes the whole body vibrate.
- How to complete a simple circuit with a battery, switch and motor, and that swapping the wires reverses the rotation.
- That the weight distribution and the angle of the legs decide whether the robot spins in circles, moves forward or stays put.
- That a simple system with a bit of chance creates drawings that can never be repeated (generative art).
Prepare beforehand
- Put new batteries in the holder and test the motor by joining its wires: the shaft should spin fast.
- Print template A at 100 %.
- Cut the pieces of eraser (15 × 10 × 8 mm) and pierce them if the children are young.
- Cover the table with the large paper and tape down the corners: the robot tends to wander off.
- Keep the pen caps to hand: if the pens are left uncapped for long, they dry out.
Materials and tools
- Rigid plastic cup — 1
200–250 ml, rim Ø 70–78 mm, base Ø 45–55 mm, ≈ 9 cm tall (reusable party cup or large yoghurt pot) - Felt-tip pens — 3
thick-tipped, washable, Ø ≈ 12 mm, in 3 different colours - Type 130 DC motor — 1 buy
3–6 V, ≈ 6000–9000 rpm, body 25 × 20 × 15 mm, shaft Ø 2 mm × 8 mm, with soldered wires - 2 × AA battery holder with switch — 1 buy
with red (+) and black (−) wires and 2 × 1.5 V AA batteries (3 V in total) - Rubber eraser — 1 piece, 15 × 10 × 8 mm
soft eraser (≈ 2 g): this is the counterweight - Corrugated cardboard — 1 piece, 10 × 10 cm
3–4 mm, for the motor riser - Duct tape or masking tape — ≈ 60 cm
to hold the legs and battery holder - Glue sticks — 1
for a hot glue gun - Large paper — 1 sheet of 50 × 70 cm or 4 A3 sheets taped together
wrapping paper or a roll of kraft paper
Tools
- Hot glue gun — gluing the riser, motor and counterweight adult
- Scissors — cutting out the template, the riser and the eraser
- Pin or thick needle — making the hole in the eraser adult
- Glue stick — sticking the template onto the cardboard
Pieces and templates
- A · Leg position template ×1 — paper
- B · Motor riser ×3 — corrugated cardboard 3–4 mm
- C · Counterweight ×1 — rubber eraser
- D · Legs ×3 — felt-tip pen Ø 12 mm
Step by step
Test the motor
Put 2 AA batteries in the holder. Twist the copper of the red wire around one motor terminal and the black around the other, and turn on the switch: the shaft should spin very fast. Switch off.
1 Put in the 2 AA batteries: flat end (−) against the spring 2 Twist the red wire onto one terminal and the black onto the other 3 Switch on: the shaft spins very fast. Then switch off Check: If it doesn't spin, check the batteries (the flat − end against the spring) and that the copper is touching the terminal.Mark the legs
Cut out template A. Place the cup upside down, centred on it, and use a felt-tip pen to mark the 3 lines on the rim of the cup, 120° apart.
1 Cut out template A along the outer circle 2 Centre the cup upside down and mark each line on its rim 3 You end up with 3 evenly spaced lines on the rim Attach the first leg
With the cup upside down, lay a felt-tip pen against the outside over the first mark, with the tip (uncapped) sticking out 25 mm below the rim. Let it rest along the wall: as the cup is wider at the rim, the pen already splays out about 8° (the tip about 15–20 mm further out than the cap end). Hold it in place with two turns of tape: one near the rim and another near the base.
1 Take the cap off and bring the pen up to the first line 2 Let the tip stick out 25 mm below the rim 3 Tape it near the rim and near the base Attach the other two legs
Repeat with the other 2 pens on the other marks, with the same 25 mm measurement. Put the robot on the table with the caps on and check that it stands only on the three tips.
1 Tape the other 2 pens on the other lines, just as low 2 With the caps on, it stands only on the 3 tips 3 If it wobbles, slide the leg that doesn't touch down to the table Check: Neither the cup rim nor the tape touches the table; the robot doesn't wobble. If it wobbles, slide a leg until it's level.Make the riser
Cut 3 rectangles of cardboard B, 30 × 22 mm, and glue them on top of each other with PVA or hot glue: a block 10 mm high.
1 Cut 3 rectangles B of 30 × 22 mm 2 Add glue and stick the layers on top of each other 3 You get a block 10 mm high Glue on the riser and the motor adult
Glue the riser onto the base of the cup (now on top), right up against the side facing one of the 3 gaps between legs, never towards a leg: the counterweight would hit the pen sticking up above the base. Glue the motor on top lying on its side, with the shaft pointing towards that gap and sticking out 6 mm beyond the edge of the base. Put hot glue on the sides of the motor, never on the shaft or the ventilation holes.
1 Glue the riser on the base, up against the side facing a gap 2 Glue the motor on its side: the shaft sticks out 6 mm past the base 3 Turn the shaft with your fingers: it should move freely Check: Turn the shaft with your fingers: it should move freely.Prepare the counterweight adult
Cut a 15 × 10 × 8 mm block of eraser. Make a hole with a pin 4 mm from one end, going through the 15 × 10 face. Push it 5 mm onto the motor shaft and fix it with a small drop of hot glue.
1 Cut the 15 × 10 × 8 mm eraser and pierce it 4 mm from the end 2 Push it 5 mm onto the shaft and fix it with a drop of hot glue 3 Turn it with your finger: it goes all the way round without rubbing Check: Turn the counterweight with your finger: it goes all the way round without rubbing the cup or the riser.Attach the battery holder
Place the battery holder upright against the side of the cup, in another of the gaps between legs (not the one the motor shaft points to), with the switch facing out. Hold it in place with two turns of duct tape around the whole cup.
1 Put it in a gap between legs, away from the motor shaft 2 Hold it with two turns of tape around the cup Tip: If the robot tips over towards the battery holder, move it up a little or switch it to the third gap, the free one.Connect and tidy the wires
Join the battery holder wires to the motor wires by twisting the copper 3 turns and cover each join with electrical tape. Tape the wires to the cup so they don't get caught in the counterweight.
1 Twist each join 3 turns: red with one wire, black with the other 2 Cover each join with electrical tape: no copper showing 3 Tape the wires to the cup, more than 2 cm from the counterweight Check: No wire is less than 2 cm from the counterweight.Uncap and test
Put the robot in the middle of the large paper, take off the 3 caps and turn on the switch. It should start shaking and hop about, leaving a 3-colour trail.
1 Put it in the middle of the paper and take off the 3 caps 2 Switch on: it shakes, hops and draws in 3 colours Adjust the movement
If it only shakes on the spot, splay the legs further (tips 5 mm further out) or swap the counterweight for a bigger one. If it tips over, bring the legs closer together or move the battery holder lower. Test for 30 seconds after each change.
1 Only shaking? Splay the tips 5 mm further out 2 Tipping over? Lower the battery holder or bring the legs in a little 3 Test for 30 seconds after each change Tip: One leg slightly shorter than the other two makes the robot spin in circles around it.Switch off and cap
When you've finished, turn off the switch and put the caps back on the pens straight away: if they're left open for more than 15 minutes they start to dry out.
1 Turn off the switch when you've finished 2 Put the caps on straight away so they don't dry out
Does it work? The test
Put the robot in the middle of a 50 × 70 cm sheet, switch on and time 1 minute. Mark the start and finish points with a pencil.
What should happen: The robot vibrates with a buzz and hops along at about 1–3 cm/s, turning and leaving spirals and loops in three colours. In 1 minute it usually travels 10 to 30 cm from the start. If it doesn't move at all, the counterweight is too small or the legs are too close together.
If something goes wrong
- The motor spins but the robot doesn't move — Counterweight too light or too centred, or legs too close together. Solution: Use a bigger counterweight or one with the hole closer to the end. Splay the legs outwards.
- The robot tips over — Legs splayed too far or too much weight on one side. Solution: Bring the legs closer together, lower the battery holder or move it to the other free gap between legs (never the one by the motor shaft).
- The motor doesn't spin — Batteries the wrong way round or flat, loose wire or counterweight rubbing. Solution: Check the batteries and the joins and turn the shaft by hand: if it rubs, move the counterweight away from the cup.
- The counterweight flies off — Hole too big or no glue. Solution: Pierce another piece of eraser with a snug hole and fix it with hot glue. Always test with your face away from the robot.
- The legs don't draw — The tips aren't touching the paper or the pen has dried out. Solution: Set all three legs to 25 mm. Change the pen.
- It always spins in the same small circle — One leg is shorter or the robot is unbalanced. Solution: Even up the legs so it wanders more; or use it to make circles and spirals on purpose.
Safety
- The counterweight spins at thousands of revolutions per minute: keep fingers, long hair and wires away while it's switched on.
- Hot glue burns: an adult uses it.
- Use washable felt-tip pens and protect the table with paper: the robot wanders off the edge.
- Don't leave the motor running if it's jammed: it gets hot. Turn off the switch.
- The pin for piercing the eraser is handled by an adult.
The science behind it
For children
The motor spins very, very fast. If you put an eraser right in the centre of its shaft, it turns smoothly. But if you put it on crooked, off to one side, the eraser pulls the motor one way, then the other, then the other... hundreds of times a second. It's like when a washing machine spins with all the clothes bunched up on one side and starts to dance. The whole robot shakes, its legs make tiny hops and, as each leg is a felt-tip pen, it draws where it has been.
For the adult
A mass m rotating at angular velocity ω at a distance r from the axis needs a centripetal force F = m·ω²·r, which the shaft exerts on the mass; in reaction, the mass pulls on the motor with a force of equal magnitude that rotates with it. With m ≈ 2 g, r ≈ 4 mm and ≈ 6000 rpm (ω ≈ 630 rad/s) under load, F ≈ 0.002 · 630² · 0.004 ≈ 3 N, of the same order as the robot's weight (≈ 1.1 N for 110 g): that is why the legs actually lift off and the robot moves in hops. Because the force has horizontal and vertical components that change with each revolution, friction with the paper is asymmetric and a net displacement and rotation appear; the direction depends on the leg angle, the mass distribution and small irregularities, hence the chaotic nature of the drawing. Mobile phones use the same principle (ERM motor, Eccentric Rotating Mass) to vibrate. The 130 motor at 3 V draws ≈ 150–300 mA: two alkaline AA batteries last several hours of use.
- vibration: a very fast back-and-forth movement.
- eccentric counterweight: a weight placed off the centre of a spinning shaft.
- centrifugal force: the outward pull you feel when something spins fast.
- electric motor: a machine that turns electricity into rotation.
- generative art: drawings created by a machine following rules and a bit of chance.
By age
- 5–7 years: The adult glues on the motor, riser and counterweight. The child marks the legs, tapes them on, connects the wires by twisting them and decorates the cup with eyes and antennae. Focus on «the crooked eraser makes the robot dance».
- 8–10 years: They build everything except the hot glue and the pin. Have them adjust the legs and counterweight until they get the movement they want.
- 11–12 years: Have them calculate the counterweight's force (F = m·ω²·r) and compare it with the robot's weight, and design a robot that draws mostly circles or mostly lines.
In a group or in class
Teams of 3, one robot per team (≈ €3 for motor and battery holder). Before the session: test all the motors, cut and pierce the counterweights, and if the children are young (5–7 years), hot-glue the riser and motor. 60 min session: 10 min demonstration, 30 min building, 20 min drawing a group mural on a 3 m roll of kraft paper on the floor, with each robot in its own area. Keep spare batteries and felt-tip pens.
Challenges
- Make the robot draw a spiral that keeps getting bigger.
- Add a fourth leg: does it move better or worse?
- Build a robot with the motor upright (shaft pointing up): how does the drawing change?
- Fit a cardboard «bumper» around it so it bounces around inside a 40 × 30 cm box without getting out.