Rubber-band box guitar
A shoebox with an 8 cm sound hole and five rubber bands stretched between anchors over two pencil bridges: each band plays a different note, you tune it by stretching it or moving the bridge, and a fret ruler lets you play a scale.
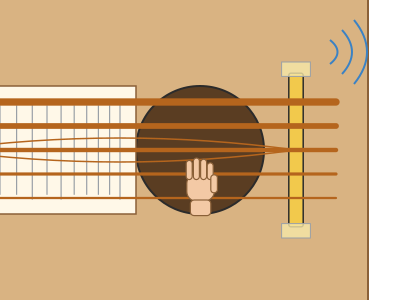
What they will learn
- That sound is a vibration and that the box with a sound hole amplifies it (resonance).
- That the note goes up when you stretch the band tighter and when you shorten the part that vibrates.
- That half the length gives the same note an octave higher (2:1 ratio), and how the 12 frets are spaced.
- That the thickness of the band matters less than it seems: tension is what counts most.
- To tune by comparing notes by ear or with a tuner app.
Prepare beforehand
- Measure your box: if the lid isn't 31 × 19 cm, keep the anchors at 20 mm and the bridges at 45 mm from each end, and the sound hole at 2/3 of the length from the neck end.
- Print the sound-hole template (A), the reinforcements (B) and the fret ruler (F) at 100 %.
- Cut out the sound hole and pierce the holes beforehand if the children are young.
- Check that the bands aren't dried out: stretch them to twice their length; if they crack, replace them.
- Keep 3 spare bands handy: one or two will snap while tuning.
Materials and tools
- Shoebox with lid — 1
≈ 31 × 19 × 11 cm, stiff cardboard; the lid must fit well - Office rubber bands — 5 (+ 3 spare)
80–90 mm long when laid flat, of different widths: 1.5 mm, 3 mm and 6 mm (sizes no. 19, 33 and 64) - Paperclips — 10
medium, 28–33 mm - Pencils — 2
hexagonal or round, Ø 7–8 mm (the bridges) - Cardboard tube — 1
from a kitchen roll, Ø 40–45 mm, cut to 250 mm - Corrugated cardboard — 1 piece 10 × 8 cm
3 mm, for the two anchor reinforcements - Card — 1 piece 80 × 120 mm
200 gsm, for the fret ruler - Sticky tape and PVA glue — 1 roll / a squeeze
parcel tape or masking tape; PVA glue or hot glue for the reinforcements and neck
Tools
- Craft knife and cutting mat — cut the 80 mm sound hole and the hole for the neck adult
- Awl or pointed wooden skewer — pierce the 10 Ø 3 mm anchor holes adult
- Ruler and pencil — mark the positions of the sound hole, anchors and bridges
- Scissors — cut the bands, reinforcements and fret ruler
- Hot glue gun (optional) — glue the neck quickly adult
- Phone with a tuner app (optional) — see the note and frequency of each band
Pieces and templates
- A · Sound-hole template ×1 — paper
- B · Anchor reinforcement ×2 — corrugated cardboard 3 mm
- C · Lid: marking-out plan ×1 — box lid (cardboard)
- D · Bridges (pencils) ×2 — pencil Ø 7–8 mm
- E · Neck ×1 — cardboard tube Ø 40–45 mm
- F · Fret ruler (L = 220 mm) ×1 — card 200 gsm
Step by step
Mark the lid
With the ruler, draw the positions from piece C on the lid: bridge lines at 45 mm and 265 mm from the neck end, and the anchor marks 20 mm from each end, at 65, 80, 95, 110 and 125 mm from the long edge.
1 Measure from the neck end: mark at 20 and 45 mm 2 Make 5 crosses at 65, 80, 95, 110 and 125 mm at each end 3 Check there are 270 mm between facing crosses Check: The two rows of anchors must face each other: measure 270 mm between them for each band.Cut the sound hole adult
Stick template A with its centre 205 mm from the neck end and centred across the width. Cut the 80 mm circle with the craft knife, using several gentle passes.
1 Stick template A with its centre 205 mm from the neck end 2 Cut with the craft knife in gentle passes, turning the lid 3 The sound hole comes out clean, between the two bridge lines Tip: Cut in short sections, turning the lid, not the knife.Glue the reinforcements
Glue the two reinforcements B inside the lid, against the rim at each end and centred across the width, with PVA glue. Put a weight on each reinforcement (a book or a full jar) for 10 minutes.
1 Cut out the two 100 × 36 mm reinforcements B 2 On the inside, glue B and push it against the rim, centred 3 Put a weight on each reinforcement for 10 minutes Check: Holding it up to the light, the holes in B should fall on the anchor marks.Pierce the anchors adult
With the awl, go through the lid and the reinforcement at the 10 marks, from the outside in, making a hole of about 3 mm. Rest it on a large eraser or a piece of cork.
1 Pierce lid and reinforcement from outside, with cork underneath 2 Make the 10 holes: 5 at each end Prepare the bands
Cut each band once to turn it into a strip of about 170 mm. Put them in order from widest to thinnest: the widest will go in the 65 mm hole and the thinnest in the 125 mm hole.
1 Cut each band just once 2 You get a strip of about 170 mm 3 Order them from widest (65 mm) to thinnest (125 mm) Tie the first end
Push the end of a band through the tail anchor hole from the outside in. On the inside, tie it to a paperclip with a double knot, so that the paperclip lies across the hole and can't come out.
1 Push the end of the band through the tail hole, from outside in 2 On the inside, tie it to a paperclip with a double knot 3 Pull from outside: the paperclip lies flat and doesn't come out Check: Pull the band from outside: the paperclip should lie flat against the reinforcement.Stretch and tie the other end
Take the band over the top of the lid to the facing hole at the neck end, push it in, stretch it and tie it to another paperclip. Stretch each band a little more than the one before: the widest to about 2 times its length, the thinnest to about 2.5 times.
1 Take the band to the neck-end hole, push it in and stretch it 2 Tie it to another paperclip: a bow first, then a double knot 3 Stretch each band a little more than the one before Tip: Tie a temporary knot (a bow) until you've checked the sound; then a double knot.Close the box
Repeat with all 5 bands and put the lid on the box. Tape the corners of the lid with 4 pieces of tape so it doesn't rattle loose.
1 Repeat until all 5 bands are fitted 2 Put the lid on the box 3 Tape the 4 corners of the lid Fit the bridges
Lift the 5 bands and slide one pencil underneath on the 45 mm line and another on the 265 mm line. Tape each end of the pencils to the lid with a piece of tape so they don't roll.
1 Lift the bands and slide a pencil onto the 45 mm line 2 Put another pencil on the 265 mm line and tape its ends 3 Check the bands don't touch the lid between the pencils Check: No band should touch the lid between the two pencils (they sit about 7 mm above it).Stick on the fret ruler
Slide ruler F under the bands and push its left edge under the pencil at the neck end up to the 45 mm line (the pencil sticks out on both sides of F): this way the edge sits exactly under the centre of the pencil, where the bands rest. Centre it across the width (from 55 to 135 mm) and stick it down with a piece of tape on the right-hand edge.
1 Cut out ruler F: line 12 is 110 mm from the edge 2 Slide F under the bands towards the pencil 3 Push its edge under the centre of the pencil, on the 45 mm line Check: Line 12 should be 110 mm from the centre of the pencil (half of the 220 mm of band) and the ruler should stick out about 10 mm beyond the first and last bands.Fit the neck adult
Draw round the tube in the middle of the short wall at the neck end, halfway up (centre 55 mm from the bottom). Cut out the circle, push the tube in 30 mm and glue it on the outside with hot glue or with 4 strips of tape in a cross.
1 Draw round the tube in the middle, 55 mm from the bottom 2 Cut out the circle with the craft knife 3 Push the tube in 30 mm, glue it and check it doesn't bend Check: Hold the guitar level by the neck: it shouldn't bend.Tune and play
Pluck each band over the sound hole with your finger. If two sound the same, untie one and give it more tension. Then press a band down on line 12 of the ruler and pluck again: it should play the same note but higher (an octave).
1 Pluck each band over the hole: each should sound different 2 If two sound the same, untie one and stretch it more 3 Press the band at line 12 and pluck: it sounds an octave higher Tip: A tuner app on a phone tells you the note and the hertz of each band.
Does it work? The test
Pluck each band over the sound hole with the lid closed; repeat covering the hole with your hand and with the lid removed.
What should happen: The 5 bands give 5 different notes, roughly between 80 and 300 Hz, from lowest (least stretched) to highest. With the box closed it sounds clearly louder than the band on its own; pressing at line 12 the note goes up an octave (double the frequency).
If something goes wrong
- It makes a dull «thunk» — The band touches the lid or the ruler between the bridges. Solution: Check the pencils: the band must be 6–8 mm clear of the lid. If the ruler is too thick, use paper instead of card.
- The lid crumples or caves in — Too much tension without reinforcement. Solution: Glue reinforcements B firmly and don't stretch the bands more than 2.5 times their length.
- The paperclip pulls out through the hole — Hole too big or paperclip parallel to the hole. Solution: Lay the paperclip crosswise or use a 25 mm piece of stick as a stopper.
- Two bands play the same note — They have the same tension. Solution: Untie one and stretch it more or less; or move that band's bridge slightly with a small piece of cardboard underneath.
- A band snaps while tuning — Dried-out band or stretched more than 3 times. Solution: Use new bands and don't go beyond 2.5 times their initial length.
- Buzzing when you play — The lid or the neck is rattling loose. Solution: Tape the lid at the 4 corners and reinforce the neck.
Safety
- Only an adult uses the craft knife, with a cutting mat and a metal ruler.
- Stretched bands can slip and snap back: keep your face away while tuning and don't stretch towards your eyes; wearing sunglasses or swimming goggles is a good idea.
- The awl is sharp: the adult pierces the holes with the cardboard resting on an eraser or cork, never on a hand.
- Paperclips and rubber bands are small parts: keep them away from children under 3.
The science behind it
For children
When you pluck a stretched band, it moves very fast backwards and forwards: that's a vibration. The band pushes the air and the air carries the sound to your ears. On its own it sounds quiet, but the hollow box vibrates with it and makes the sound much bigger, like when you talk inside a cave. If you stretch the band more, it vibrates faster and sounds higher; if you make it shorter by pressing it down, it also sounds higher.
For the adult
A taut string vibrates at a fundamental frequency f = (1/2L)·√(T/μ), where L is the vibrating length (here 220 mm between the pencils), T the tension and μ the mass per unit length. Halving L doubles f (an octave); each equal-tempered fret shortens the string by a factor of 2^(−1/12) ≈ 0.944, which is why line n sits at L·(1 − 2^(−n/12)) from the bridge. In rubber, T and μ depend on the cross-section: a band twice as wide has twice the μ and, at the same elongation, roughly twice the T, so its frequency is almost the same. Thickness doesn't change the pitch much; what controls it is elongation (more stretch: more T and less μ, because the band gets thinner). The band alone moves very little air; the pencils pass the vibration to the lid, which acts as a radiating plate, and the box with its sound hole forms a Helmholtz resonator (for ≈ 6.5 litres and an 80 mm hole, around 150–200 Hz) that reinforces the low notes. Covering the hole removes that resonance and the sound goes dull.
- vibration: a fast back-and-forth movement.
- frequency: how many vibrations there are in one second; it is measured in hertz (Hz).
- tension: how stretched and tight the string is.
- sound box: a hollow that vibrates with the string and makes the sound louder.
- octave: the same note but higher, with double the frequency.
By age
- 5–7 years: The adult cuts the sound hole, pierces the holes and ties the bands. The child places the pencils, tapes on the neck, decorates and explores: more stretch = higher note.
- 8–10 years: They tie and tune the bands themselves, use the fret ruler and check the octave at line 12.
- 11–12 years: They tune the 5 bands to a pentatonic scale (C, D, E, G, A) with the app, measure frequencies and check the formula f ∝ 1/L by moving the bridge.
In a group or in class
Each child brings their own shoebox; teams of 2 to help each other stretch the bands. Per class: 150 rubber bands, 300 paperclips, 50 pencils and 25 tubes. Beforehand: the adult cuts the sound holes and pierces the lids (15 min for 25 boxes with the template). 60 min session: 10 min demonstration, 35 min building and tuning, 15 min «orchestra» playing a simple song in groups.
Challenges
- Tune the 5 bands to play «Jingle Bells» or «Twinkle, Twinkle, Little Star».
- Build a bass: a bigger box with long 8–10 mm bands.
- Make the bands run over the neck with a third bridge at the end of the tube to get a proper neck.
- Add a capo: a clothes peg with a rubber band that presses all the strings down at one line.