Musical scale with bottles
Six identical glass bottles, tuned with different amounts of water, make the scale do-re-mi-fa-sol-la: tap them with a spoon and they play six different notes, so you can play songs like “Twinkle, Twinkle, Little Star”.
What they will learn
- That sound is a vibration: if you touch the bottle while it is ringing, you feel a tingle and the sound dies away.
- That when you TAP a bottle, the more water it holds, the lower it sounds (more mass vibrates, more slowly).
- That when you BLOW across the mouth of the bottle, the opposite happens: more water = less air = higher sound.
- What a musical scale is (do-re-mi-fa-sol-la) and how an instrument is tuned by comparing sounds.
- How to read a simple score written with numbers and colours.
Prepare beforehand
- Gather 6 identical bottles, soak off their labels in hot water and check them for cracks by running your finger over the rim and the body.
- Print the template sheet at 100 % and cut out the filling ruler (A) and the labels (B).
- Prepare the area: a sturdy table, a tray or tea towel underneath and the bottles away from the edge (at least 10 cm).
- If you are going to use a tuner app, download it and test it first by clicking your fingers near the microphone.
- Keep a jug with 1.5 l of water to hand so you don't have to keep going back to the tap.
Materials and tools
- Identical glass bottles — 6
same brand and model, smooth (no raised patterns), no cracks or chips; ideally 330 ml juice or fizzy drink bottles, or 500–750 ml bottles (they sound lower and louder) - Tap water — ≈ 1.2 l in total
at room temperature - Food colouring — 1–3 drops per bottle
6 colours: red, orange, yellow, green, blue, purple (do → la) - Wooden skewer — 1
to stir the colouring inside the bottle (it fits through the mouth) - Metal spoon — 1 (or 2 to play with both hands)
steel teaspoon or dessert spoon - Measuring jug — 1
with 50 ml markings - Needle-free syringe or dropper — 1
5–20 ml (the kind for children's medicine), for fine tuning - Small funnel — 1
that fits into the mouth of the bottle - Clear sticky tape — 1 roll
to stick on the ruler and the labels - Masking tape — 6 strips of 10 cm
stuck vertically on the glass so you can mark the level with a felt-tip pen on bottles that have no ruler - Tea towel or tray — 1
to catch splashes while filling
Tools
- Scissors — cut out the filling ruler and the labels
- Phone or tablet with a (free) chromatic tuner app or a piano app — accurate tuning and recording the tune (optional)
- Fine permanent marker — mark the level of each note on the ruler
Pieces and templates
- A · Filling ruler ×1 — paper or 160 gsm card
- B · Note labels ×1 — paper (colour each in its note's colour)
Step by step
Prepare and test the empty bottles
Stand the 6 empty bottles in a row on the tray, 2 cm apart. Tap each one on the shoulder (where it narrows) with the spoon: they should sound almost the same. Put aside any that sounds dull or “cracked”: it may have a crack.
1 Stand the 6 empty bottles in a row, 2 cm apart 2 Tap each one gently on the shoulder with the spoon 3 Put aside any that sounds dull or “cracked”: it may have a crack Check: All 6 give a clean, similar “ting”.Stick on the filling ruler
Cut out ruler A and cut off the strip at the bottom along the cutting line, so that 4 mm of paper is left below the 0 line. Stick it vertically on the back of bottle 1 with clear tape, with its bottom edge resting on the table: this puts the 0 line level with the inside bottom of the bottle (3–5 mm above the table).
1 Cut out ruler A and the bottom strip: leave 4 mm below the 0 2 Tape it vertically to the back of bottle 1 3 The 0 line is level with the inside bottom, not the table Check: The edge of the ruler touches the table and the 0 line matches the inside bottom you can see through the glass.Tip: If you are patient, print 6 rulers and put one on each bottle: tuning will be quicker.Fill bottle 1 (DO, the lowest)
Using the jug and the funnel, pour 240 ml of water into bottle 1 (330 ml bottle; in a 500 ml one, 360 ml; in a 750 ml one, 540 ml). It holds the most water and sounds the lowest: it will be DO.
1 Measure 240 ml of water in the jug 2 Pour it into bottle 1 through the funnel 3 It holds the most water: it will be DO, the lowest Fill the others using the starting table
Pour into each bottle (for 330 ml): 2-RE 205 ml, 3-MI 175 ml, 4-FA 155 ml, 5-SOL 120 ml, 6-LA 75 ml. For 500 ml bottles multiply by 1.5. These are starting amounts: every bottle is different and you will need to tune them afterwards.
1 Pour the ml from the table into each bottle 2 The levels go down from left to right like a staircase Check: The levels go down from left to right like a staircase.Colour the water
Add 1–3 drops of colouring to each bottle: 1 red, 2 orange, 3 yellow, 4 green, 5 blue, 6 purple. Cover the mouth with your palm and shake gently, or stir with a skewer.
1 Add 1–3 drops of its note's colour to each bottle 2 Cover the mouth with your palm and shake gently 3 Red, orange, yellow, green, blue and purple from 1 to 6 Tip: The colouring does not noticeably change the sound: it is only there so you can read the score by colour.Listen to the staircase of sounds
Tap the bottles in order from 1 to 6 with short, gentle taps on the shoulder, above the water. You should hear a staircase going up: from low (1) to high (6). If any bottle is out of order, adjust its water.
1 Tap short and gentle on the shoulder, above the water 2 From 1 to 6 the sound must always go up Check: Going from 1 to 6, the sound always goes up.Tune DO and LA at the two ends
Sing “do-re-mi-fa-sol-la” starting on the note of bottle 1. If bottle 6 is higher than your “la”, add water with the syringe 5 ml at a time; if it is lower, take water out with the syringe. Remember: more water = lower.
1 Sing the scale starting on the note of bottle 1 2 Higher than your “la”? Add water 5 ml at a time 3 Lower? Take water out with the syringe Tip: With a tuner app: write down the note it shows for bottle 1 (for example, C) and tune the others to D, E, F, G and A in that same octave.Tune the notes in between
Play 1-2-3-4-5-6 over and over while you sing the scale. Correct each bottle by 2–5 ml at a time, always comparing it with the one before. The step between MI (3) and FA (4) is smaller than the others: they should sound very close.
1 Play 1-2-3-4-5-6 over and over while you sing 2 Correct by 2–5 ml comparing with the one before; MI and FA very close 3 With an app: the needle must stay in the centre Check: The scale sounds like a piano's and doesn't sound “out of tune” when you play it fast.Mark the levels and add the labels
Once the bottle is in tune, mark its water level on the ruler with a felt-tip pen (or on a strip of masking tape stuck to the glass). Cut out the B labels and stick each one on the neck of its bottle.
1 Mark the water level on the ruler with a felt-tip pen 2 Cut the B labels into 6 squares of 30 × 30 mm 3 Stick each label on the neck of its bottle Play “Twinkle, Twinkle, Little Star”
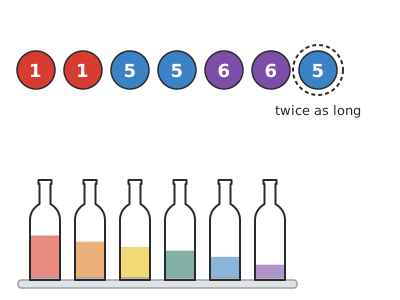
Play following the numbers: 1 1 5 5 6 6 5 · 4 4 3 3 2 2 1 · 5 5 4 4 3 3 2 · 5 5 4 4 3 3 2 · 1 1 5 5 6 6 5 · 4 4 3 3 2 2 1. The last note of each line lasts twice as long.
1 Play following the numbers: 1 1 5 5 6 6 5… 2 Hold the spoon loosely and let it bounce 3 If you press it against the glass, you stop the sound Tip: Hold the spoon loosely between your thumb and two fingers and let it bounce: if you press it against the glass, you stop the sound.Compare with blowing
Blow across the mouth of bottles 1 and 6, with your lower lip resting on the rim and the stream of air just skimming the opening. Check that now bottle 1 (lots of water, little air) sounds HIGHER than bottle 6. The opposite of tapping!
1 Blow across the opening, lower lip on the rim 2 Now bottle 1 sounds higher than 6: the other way round! 3 Explain why the order is reversed Check: The child can explain in their own words why the order is reversed.
Does it work? The test
Play the scale 1→6 and then the whole of “Twinkle, Twinkle”. If you have a tuner app, tap each bottle and write down the note and how far off it is in cents.
What should happen: The 6 bottles sound in rising order and make a recognisable do-re-mi-fa-sol-la; with an app, each bottle is within ±20 cents of its note. With 330 ml bottles the notes fall roughly between C6 and A6 (≈ 1000–1800 Hz); with 750 ml bottles, about an octave lower.
If something goes wrong
- The bottles all sound almost the same — With little water the pitch hardly changes: the effect of the water is small until it reaches halfway up the bottle. Solution: Use more water in all of them: the big differences in pitch appear between 50 % and 90 % full. If that is not enough, use bigger bottles.
- The sound is dull, a short “tock” — You are tapping where the water is, pressing the spoon, or the bottle is cracked. Solution: Tap on the shoulder or the neck, above the water, letting the spoon bounce. Check for cracks and replace that bottle.
- The scale sounds out of tune — Notes badly adjusted, especially MI-FA (a semitone) and the rest (whole tones). Solution: Fine-tune by comparing them in pairs with a tuner app or a piano app. Adjust with the syringe 2 ml at a time.
- I added water and the note went up — You were blowing instead of tapping, or you compared it with the bottle next to it. Solution: Tapping: more water = lower. Blowing: more water = higher. Always test in the same way.
- The next day it doesn't sound the same — Some water has evaporated or someone has moved the bottles. Solution: Top up to the mark on ruler A. Put the caps on the bottles when you are not using them (the cap doesn't change the sound when you tap).
- A bottle resonates with the one next to it — They are touching or too close together. Solution: Space them at least 2 cm apart; glass touching other glass gets damped and buzzes.
Safety
- Glass: always tap gently. A hard knock with a metal spoon can break a bottle; check for cracks before you start and remove any chipped bottle.
- With 5–6-year-olds the adult moves the full bottles; work on a tray and away from the edge of the table.
- If a bottle breaks, move the children away, pick up the pieces with gloves and a broom, and dry the water so nobody slips.
- Each child blows only into their own bottle (hygiene); wash the bottles afterwards with soap and water.
- Food colouring stains clothes and wood: use a tea towel or tray and an apron.
The science behind it
For children
When you tap the bottle, the glass shakes very fast, so fast that you can't see it, and that shaking pushes the air all the way to your ears: that is sound. If the bottle has lots of water, the glass also has to move the water touching it, so it shakes more slowly, like a swing with a big child on it: that is why it sounds lower. With little water it shakes fast and sounds high. But if you blow, what sounds is the air inside: a little air sounds high, like a small whistle.
For the adult
When tapped, the bottle vibrates in bending modes of the glass wall (similar to a wine glass). The frequency depends on the stiffness and on the mass taking part in the vibration: the water in contact with the wall moves with it and adds effective mass, so the frequency drops as the level rises. The effect is highly non-linear: with little water it hardly changes (the lower part of the wall barely deforms) and it grows a lot from half full upwards; for wine glasses the approximation f ≈ f₀ / √(1 + α·(h/H)⁴) is used. When you blow, on the other hand, it is the column of air that sounds: the bottle works as a Helmholtz resonator, f = (c/2π)·√(A/(V·L)), with c ≈ 343 m/s, A the area of the neck, L its effective length and V the volume of air; adding water reduces V and the frequency goes up. That is why the order is reversed between tapping and blowing. The major scale do-re-mi-fa-sol-la has the intervals tone-tone-semitone-tone-tone (ratios ≈ 1.122 per tone and 1.059 per semitone in equal temperament); the sixth do-la is a frequency ratio of ≈ 1.68. Oil (less dense, ρ ≈ 0.92) lowers the frequency less than water for the same height; vinegar (ρ ≈ 1.01) sounds almost the same as water.
- vibration: a very fast back-and-forth movement that makes sound.
- frequency: how many vibrations there are each second; it is measured in hertz (Hz).
- pitch: how high or low a sound is: higher frequency, higher pitch.
- scale: an ordered series of notes, such as do-re-mi-fa-sol-la-ti.
- tune: adjust an instrument so that each note sounds at the right pitch.
By age
- 5–7 years: The adult fills the bottles with the amounts in the table and the child adds the colouring, taps and discovers “more water = lower”. Have them play “Twinkle, Twinkle” following colours instead of numbers.
- 8–10 years: They fill the bottles measuring with the jug, tune them by ear by singing the scale and write their own numbered score.
- 11–12 years: They tune with a tuner app (±20 cents), record ml and hertz and draw a water level–frequency graph. Challenge: extend to 8 bottles (full scale up to the high do).
In a group or in class
Teams of 4 children, one set of 6 bottles per team (ask families for identical bottles a week in advance). Before the session: bottles cleaned and checked, jugs of water and trays on each table. 45-min session: 5 min demonstration (tapping vs blowing), 10 min filling, 15 min tuning (one phone with an app per team), 15 min concert: each team plays one line of “Twinkle, Twinkle” and together they complete it.
Challenges
- Add two more bottles (ti and high do) to have the full scale and play “Happy Birthday”.
- Build a cardboard stand that hangs the bottles by the neck with string: do they ring for longer when hanging?
- Tune two identical xylophones and play a song in two parts.
- Make a beater from a wooden skewer with a ball of modelling clay or cork on the end and compare its sound with the spoon's.